Using UV-mapping with POV-Ray meshes
What is UV-mapping ?
Imagine that you want to put a realistic texture
on a model of a human body. "Realistic" means that you need to create subtle
variations of colour: the skin will be rosier here, darker there and so on. Since this
looks very difficult to do by procedural means (i.e. using patterns like bozo or
gradient), it is likely that you'll want to use an image map. But then, how are you going
to map this picture on the model ? There are different mapping types available, but only
for simple primitives : plane, sphere, cylinder... Even if you assume that a body is
somehow cylindrical, it will very difficult to position a particular colour on a
particular spot. This could turn into a nightmare of trial-and-error, if it's possible at
all. Fortunately, UV-mapping is the right tool for this.
A UV map looks
like the following:
The first picture is a UV template for a mesh of
a head (Poser 4 Nude Woman), while the second one is the final painted version (actually a
part of the one used for Eve's morning). Unlike a
regular image map, which is projected on the model according to one of the mathematical
map types, this map will fit the model exactly. The lines on the templates are the mesh
polygons (triangles). The model will be painted according to its colour on the map : for
this each vertex of the mesh has a map co-ordinate - the <u,v> vector - associated
to it. |
|
|
What kind of objets can be UV-mapped ?
The most basic type of UV-mapping is the mapping of
primitives: refer to the documentation of Megapov or POV 3.5 and higher for the full list
of supported primitives. The map_types (already available in POV 3.1) are a specialised
form of UV-mapping available for image maps and a very limited number of primitives.
The most powerful use of UV-mapping is the mapping of meshes.
Since the professional 3D tools work with meshes, they usually support UV-mapping. In
fact, any mesh can be potentially UV-mapped.
POV blobs, CSG constructs
(union/merge/difference/intersection) and some primitives (julias...) cannot be UV-mapped.
Note : this tutorial will only cover UV-mapping for
meshes. For other uses of UV-mapping, please refer to the Megapov and POV 3.5
documentation.
What mesh formats for POV?
In Megapov and POV 3.5 and higher, there are two mesh formats
that support UV-mapping. These UV meshes contain information about the geometry and
normals, but also about the way they are textured (the UV vectors).
- The first mesh type is an extension of the regular mesh
format, and has UV vectors attached to every triangle.
- The second one is the mesh2 format, which is much more compact
than the previous one and parses faster. Because of these latter qualities, this tutorial
will deal mainly with mesh2.
Note that there is an important behavioural difference
between a UV-mapped mesh2 and a traditional one. With a classic mesh, each copy of it can
be independently textured, so that you can parse the mesh once and still have copies with
different textures. With mesh2, the texture is given at parsing time, so that all its
copies have the same texture. If you need another copy with a different texture,
you’ll need to parse the mesh again.
What do you need to make UV-mapping work in POV?
First, you'll need a version of POV that supports it, like
Megapov or POV 3.5 and higher. Because mesh UV-mapping was only recently supported by POV,
there are few utilities that deal with it. Important note : this tutorial is Windows only.
Of the utilities below some may have Linux or Mac versions.
- 3DS2POV : conversion from 3DS to Megapov/POV 3.5 mesh2 format
- OBJUVPOV : conversion from OBJ format to
Megapov/POV3.5 mesh 2 format and regular mesh format with UV information
- POSE2POV : conversion from OBJ format
exported to Megapov/POV 3.5 mesh2 format (also Linux)
- OBJ2POV : conversion from OBJ format to Megapov/POV3.5 regular
mesh format with UV information (not available right now, but it was the first tool I
used)
These other utilities will be handy:
- sPatch
: a popular modeller that exports to DXF and bicubic patches (beware: temporary hosting)
- Hamapatch : a soon-to-be popular modeller
- 3DWIN
: conversion between 3D formats (shareware, keeps UV info)
- Crossroads
: conversion between 3D formats (freeware, ignores UV info)
- UVMapper : adds or
modifies the UV-mapping info of a mesh and creates a UV map template. It only reads and
exports in the OBJ format (also Mac).
You will also need a paint programme such as Photoshop or
Paintshop Pro that can read and save in the major graphic file formats (JPG, TIFF, TGA,
PNG and BMP).
Converting meshes to POV
Any mesh can be theoretically UV-mapped and converted to be
used in POV. Presently (June 2000), there is no 100% reliable way to convert an OBJ or 3DS
file with UV-mapping to POV. All the converters listed above are prone to crash on
particular files or to produce files that don't render properly. It seems that some
converters only support subsets of the file specifications : for instance, they may
convert correctly an Poser OBJ file, but will produce an erroneous mesh with a Lightwave
OBJ. When this happens, try another converter. Still, my favourite is 3DS2POV, which I
have used quite extensively in 1999-2000. However, it requires a prior conversion to 3DS
which may be itself tricky.
Conversion of UV-mapped meshes with existing maps
Using Poser - a commercial package dedicated to the creation
of human and animal characters - is one of the main reasons why many POV users (including
me) are interested in UV-mapping, so I’ll use Poser as an example. Poser exports to
several formats, including OBJ and 3DS, which are already UV-mapped, and the image and
bump maps are available with the models.
From a Poser model to mesh2
There are two ways to do this.
- You can export the Poser object to OBJ and use either POSE2POV
or OBJUVPOV to convert it to mesh2. I've little experience there (I had crashes or
incorrect meshes) but other people have used them with success. Also, OBJUVPOV can also
export to the regular-mesh-with-UV-info format, so that this can be a "plan B"
when the conversion to mesh2 doesn't work (to do this, look in the
Tools>Options>POV-Export menu of OBJUVPOV).
- You can export the Poser object to 3DS and use 3DS2POV to
convert it to mesh2. The main problem here is that the export plug-in is very buggy for
Poser 3 and some Poser 4 versions. For these versions, the plugin-in may distort meshes,
or it may export meshes that crash other utilities. There's a patch (US/English and German
versions only at this time of writing) available at CuriousLabs,
the latest Poser's home. If you can't install the patch, you may use the following
workaround: 1) export the object(s) to OBJ format, 2) create a new empty Poser document,
3) import the OBJ object into Poser and 4) export it to 3DS format.
Once you have exported the model to mesh2, you should obtain
several files, depending on the converter. Basically they produce a file that contains the
model, a file for the textures and a *.pov file that can be run directly.
In the case of a conversion through 3DS2POV, and assuming
that the 3DS file was called TOTO.3DS, then:
- TOTO_O.INC is the object file itself.
- TOTO.POV is a ready-to-use POV file.
- TOTO_M.INC contains the material (texture) information.
- TOTO_A.INC is related to animation.
Editing the textures
When you open the TOTO_M.INC file, you’ll see that it
contains one or several texture definitions. In fact, a UV-mapped mesh can use many
different textures, each texture being attached to one particular part of the mesh.
Typically, Poser models produce mesh2 meshes that require a dozen or so textures.
However, it usually doesn’t make sense to use the
textures as they are in the TOTO_M.INC file, because they’re only templates with
dummy colours. You’ll need to edit the TOTO_M.INC, and replace the texture info by
the correct pigment (image map) and finish information, or even add a normal statement.
Usually, there is a texture called "default_texture" that you can use as a
starting point. Once edited, the material file should look like this:
#declare default_texture = texture {
pigment{image_map{png "p4woman.png"}} // the UV map
finish{metallic brilliance 2 ambient 0.01 diffuse 0.6 specular 0.03 roughness 0.05}
}
#declare Mskin=texture{default_texture} // the main texture
#declare Meyeball =texture{Mskin finish{reflection 0.3}}
#declare MeyeBrow = texture{Mskin}
#declare Mnipple = texture{Mskin}
#declare Mlips = texture{Mskin finish{ambient 0.1 diffuse 0.3 specular 1 roughness 0.01}}
#declare MinnerMouth = texture{Mskin}
#declare Mtongue = texture{Mskin}
#declare Mteeth = texture{Mskin}
#declare Mlashes = texture{Mskin}
#declare Mpupil = texture{Meyeball}
#declare Miris =texture{ Meyeball}
The textures names are usually self-explanatory, at least for
Poser models. This is not always the case with all models and sometimes it is necessary to
do some tests to figure out the precise use of the textures.
In the above example, all the textures are based on the
image_map provided with the Poser model. You may need to convert the original map (often a
TIFF file) into a format that POV-Ray can read. Note that the Poser bump maps (*.BUM)
files are actually BMP files, at least in the Windows version : all you need is change the
extension (and increase the contrast of the bump map).
The image map is defined once and then used for all the body
parts, with some variation in the finish statement. This is because the Poser maps usually
cover the whole body: it’s the same map for the eyes and for the skin. In the example
above, some reflection was added to the standard map for the eye parts (eyeballs, pupil,
iris).
In this case, only one map is needed. Other models may
require several maps. For instance, Zygote’s Millenium Woman "Victoria",
which is much more detailed than the standard Poser 4 nude woman, requires one map for her
body and another for her face. Hair, clothes and accessories will need their own maps.
The use of an image map is not at all mandatory: you can put
anything in the texture statement. In fact, you may provide no map at all and use
UV-mapping info only to give different colours to the different body parts, or mix image
maps and regular texture statements. In the above example,
#declare Miris = texture{pigment{SkyBlue}}
would change the colour of the iris from whatever colour is
present at this location in the image map to a SkyBlue colour.
If you're using another converter, the process should be more
or less the same.
One last thing about textures: because UV maps match exactly
the model geometry, you’d better not change the position of the elements of the map.
It’s possible to do so, though, see the UVMapper
page for further detail. Of course, you can alter the colours to suit your needs, or the
size of the map (the UV co-ordinates are relative to the map, not absolute).
Putting the model in your POV scene
Once the textures are all prepared, you need to put the model
in your POV scene. The TOTO.POV file is a ready-to-use scene that you can use as a
template. It reads the other files (TOTO_O.inc, TOTO_A.INC and TOTO_M.INC). Though it
works perfectly, I’ve always found that the default camera settings and lighting
weren’t very practical for test purpose, so I usually edit this scene, add my own
camera and lights to get a frontal scene and remove the call to TOTO_A.INC. The TOTO.POV
scene also contains information about the min/max spatial co-ordinates of the mesh which
is very handy when you need to position the mesh. Poser models are often very small, a POV
unit or so high. Other models can have every possible size.
Sometimes, 3DS2POV outputs not one mesh but several (all in
the same TOTO_O.INC file though). All these meshes are listed in TOTO.POV. It may be
useful to put them together in one union{} statement.
If you use UV-mapping with Megapov or another unofficial
version, you’ll need to add the version info at the beginning of the mesh file:
#version unofficial Megapov xxx.yyy; // where xxx.yyy
is the version number of Megapov.
Summary
To use a UV-mapped model, you’ll need:
- One or several image files to be used as UV-maps.
- A file containing the mesh2 info (geometry + normals +
UV-mapping)
- A file containing the texture definitions
- A file containing the calls to the previous files, and a
declaration of the final object.
Conversion of UV-mapped meshes without existing maps
The process is pretty much the same as above, with one
difference: you’ll need to generate the map yourself. Fortunately, this is almost
automatic.
The first step is to convert your file to the OBJ format.
This can be done with 3DWIN, or with any software that can read your original file and
export to OBJ with the UV info untouched. DON’T USE CROSSROADS, because it ignores
the UV info.
The second step is to use a UV-mapping utility. The most
popular is Steve Cox’s UVMapper. If the
mesh contains UV info, just load the OBJ file: UVMapper will build and show the map
template automatically. Once you have saved the template, you can paint it using your
favourite image editor. Note that the template is in 8-bit black and white: before
painting you may need to increase the colour depth to 24-bit RGB.
After that, you can proceed as explained in the previous
section.
Conversion of meshes without UV info: from sPatch to POV-Ray
In the two previous cases, the UV info was already there. In
all probability, the UV info was created using tools that let you paint interactively on
3D models. AFAIK, there are no such tools available for free, or as low-cost shareware. If
you don’t have a tool like this, you’ll need to rely on UVMapper to do the job.
Here is a step-by-step example based on sPatch, Crossroads,
UVMapper and POSE2POV. It also requires a version of POV that supports UV-mapping. The
files (but not the programmes) necessary to the demo are bundled here.
This works pretty much the same with OBJUVPOV.
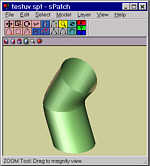
1. Create the model in sPatch
- Here is a simple bent cylinder (TESTUV.SPT).
- Export it to DXF, using File>Export>DXF>Low (8
poly/patch) under the name TESTUV.DXF
2. Convert it to OBJ by Crossroads
- Load the DXF into Crossroads
- Select the model by clicking on the left mouse button
- Click on the right mouse button, then click on
"smooth" in the submenu. This will create the smoothing (normal) information.
- Save as an OBJ model under the name TESTUV.OBJ
|
|
3. Create the UV info
- Load the model into UV-mapper.
- UV-mapper gives some stats, then, after clicking OK, it
informs you that this object has no UV texture co-ordinates
- Choose Edit>New UV Map>Cylindrical
- Give 150 for the map size (no need for a larger map now) and
click OK
- The UV map appear: it should look like the image on the right.
- Choose Edit>Select>All. The map is selected.
- Choose Edit>Assign>To Material
- Create a material called TESTUVMAP. Assigning a material is
very important, otherwise the converter won't know what texture it must put on the model.
- Choose File>Save model>OK. Save the model as
TESTUV2.OBJ. This OBJ file contains the UV information. You can open this file in the POV
editor and see it by yourself: it's the vectors that begin with "vt" (for vertex
texture I suppose).
- Choose File>Save Texture Map>OK. Save as
TESTUVTEMPLATE.BMP.
|
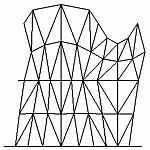 UV map UV map
|
|
4. Convert to mesh2
- Under MS-DOS, go to the POSE2POV directory
- At the prompt, type pose2pov -uv TESTUV2 TESTUV2
(assuming the TESTUV2.OBJ file is in the POSE2POV directory)
- POSE2POV creates TESTUV2.POV (ready-to-render file),
TESTUV2.INC (mesh file) and TESTUV2T.INC (texture file)
|
5. Edit the files and run POV
- Open POV and load the three files. Some editing is needed.
- If you're using an unofficial version of POV based on POV 3.1,
you will need to add something like "#version unofficial Megapov 0.4." at the
top of the mesh file TESTUV2.INC. It shouldn't be necessary if you use POV 3.5.
- Open the TESTUV2T.INC. This file contains the texture
statement, presently a dummy one. Replace the pigment statement by pigment {
image_map{sys "TESTUVTEMPLATE" }}
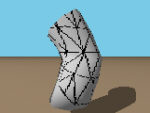
- Run TESTUV2.POV. You should obtain the first image on the
right. You can notice that the lines doesn't fit the object: in fact the map is reversed
(y values are 1-y). Scaling it by <1,-1,1> removes the problem, but in fact we won't
need it. This problem seems to be due to the fact that the map is a 8-bit black and white,
not a 24-bit RGB one (please don't ask me why !)..
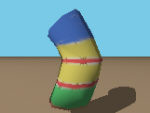
- Edit the template in your favourite image processor.
First, increase the colour depth, from 8-bits to 24-bits, then paint whatever you want on
it using the grid as guidelines.
- Replace the name of the template by the name of the final map
in the TESTUV2T.INC file.
- Run TESTUV2.POV. The second image shows the cylinder mapped
with the new painted map (you can see that the inversion problem is gone).
|
|
Notes:
- UVMapper can’t manipulate the object in 3D space.
Instead, it proposes several options for a rather simple mapping, which can be very
efficient anyway. The options available are planar, spherical, cylindrical, cylindrical
with cap, box. UVMapper will try to fit the geometry of your object on a map, so choose
the geometry that is closest to your model. Complex objects with not be easily mapped
because the projection of the mesh in 2D will be hard to figure out (if not all messed
up), but objects with a regular shape are good candidates.
- Once you’ve defined a UV map, you can select parts of it
and move or resize them to make them bigger and easier to paint. After the template is
completed, save it (Save Texture map) and - this is very important - save the mesh file
(Save Model) as an OBJ file, because this is where UVMapper will add the new UV info to
the mesh.
Known problems and workarounds
There are LOTS of things that can go wrong... Normals or UV
vectors disappear or are totally messed up, wrong number of items in the indices lists
cause errors etc. If mesh2 drives you mad, try to convert to the other UV-aware mesh
format using OBJUVPOV. Try several converters if one doesn't give the right answer.
Here are some solutions to problems I’ve come across.
My Poser model is all distorted when converted to mesh2, or
refuses to be exported, or crashes 3DS2POV
- You may have a buggy version of Poser’s export plug-in.
Look for the patch that fixes it. If the patch can’t be installed, export to OBJ,
import the OBJ file, export to 3DS. Or try a direct OBJ to POV conversion. If you’re
using a Poser character with props, posable hair, or clothes, it may be necessary to
export all the objects separately (be careful that they remain at their original absolute
position). They will be easier to manage in POV anyway.
The map is all wrong and doesn’t seem to UV-map anything
There may be two reasons for this (at least reasons I know
of).
- One is that the UV information has been lost in the process.
This happens when using 3DWIN to convert certain meshes. Look in the *_O.INC file
generated by 3DS2POV: you should see at the end of the file the "uv_mapping"
keyword. If it’s not there, this means that the UV vectors have been deleted during
conversion. The only workaround I know are 1) to find another OBJ to 3DS converter or 2)
to try a direct OBJ to POV conversion.
- If the UV information is in the mesh file, you may sometimes
need to invert the map. All you need is to scale the texture by <1,-1,1>.
The map appears correctly but I can see "seams" or
erratically mapped triangles
- Poser maps sometimes give visible seams on the back or legs of
characters. The simplest fix is to remove all the white areas from the map, by painting
them the same flesh/fur colour as the closest body part.
- With regular meshes produced by OBJ2POV, I’ve noticed
erratically mapped triangles, usually appearing only on one side of the mesh, or on the
back. No workaround known, just avoid showing the wrong side of the mesh to the camera.